етЦЊНЬГЬOpenCV-PythonЪЕЯжТжРЊЕФЬиеїжЕаДЕУКмЪЕгУЃЌЯЃЭћФмАяЕНФњЁЃ
ЧАбдТжРЊздЩэЕФвЛаЉЪєадЬиеїМАТжРЊЫљАќЮЇЖдЯѓЕФЬиеїЖдгкУшЪіЭМЯёОпгаживЊвтвхЁЃБОЦЊВЉЮФНЋНщЩмМИИіТжРЊздЩэЕФЪєадЬиеїМАТжРЊАќЮЇЖдЯѓЕФЬиеїЁЃ
ПэИпБШдкТжРЊжаЃЌЮвУЧПЩвдЭЈЙ§ПэИпБШРДУшЪіТжРЊЃЌР§ШчОиаЮЕФТжРЊПэИпБШЮЊЃК ПэИпБШ=ПэЖШ/ИпЖШ ЯТУцЃЌЮвУЧРДМЦЫуОиаЮТжРЊЕФПэИпБШЃЌДњТыШчЯТЃК import cv2img = cv2.imread("26_1.jpg")cv2.imshow("img", img)# зЊЛЛЮЊЛвЖШЭМЯёgray = cv2.cvtColor(img, cv2.COLOR_BGR2GRAY)ret, binary = cv2.threshold(gray, 127, 255, cv2.THRESH_BINARY)contours, hierarchy = cv2.findContours(binary, cv2.RETR_LIST, cv2.CHAIN_APPROX_SIMPLE)x, y, w, h = cv2.boundingRect(contours[0])cv2.rectangle(img, (x, y), (x + w, y + h), (0, 0, 255), 3)cv2.imshow("img1", img)aspectRatio=float(w)/hprint(aspectRatio)cv2.waitKey()cv2.destroyAllWindows()дЫаажЎКѓЃЌЮвУЧПЩвдЕУЕНТжРЊЕФПэИпБШдМЮЊ3ЃК

ExtendЮвУЧЛЙПЩвдЪЙгУТжРЊУцЛ§гыОиаЮБпНчУцЛ§жЎБШExtendРДУшЪіЭМЯёМАЦфТжРЊЬиеїЃЌЪ§бЇМЦЫуЙЋЪНЭМЯТЃК Extend=ТжРЊУцЛ§/ОиаЮБпНчУцЛ§ ЯТУцЃЌЮвУЧРДМЦЫуExtendЃЌДњТыШчЯТЃК import cv2img = cv2.imread("26_1.jpg")cv2.imshow("img", img)# зЊЛЛЮЊЛвЖШЭМЯёgray = cv2.cvtColor(img, cv2.COLOR_BGR2GRAY)ret, binary = cv2.threshold(gray, 127, 255, cv2.THRESH_BINARY)contours, hierarchy = cv2.findContours(binary, cv2.RETR_LIST, cv2.CHAIN_APPROX_SIMPLE)x, y, w, h = cv2.boundingRect(contours[0])rectArea=w*h#ОиаЮБпНчУцЛ§cntArea=cv2.contourArea(contours[0])#ТжРЊУцЛ§extend=float(cntArea)/rectAreaprint(extend)БОР§жаЃЌТжРЊУцЛ§гыОиаЮБпНчУцЛ§ЕФБШжЕExtendДѓдМЮЊ0.8ЃК

SolidityЮвУЧЛЙПЩвдЪЙгУТжРЊУцЛ§гыЭЙАќУцЛ§жЎБШSolidityРДКтСПЭМЯёЃЌТжРЊвдМАЭЙАќЕФЬиеїЁЃЦфЪ§бЇМЦЫуЙЋЪНЮЊЃК Slidity=ТжРЊУцЛ§/ЭЙАќУцЛ§ ЯТУцЃЌЮвУЧРДМЦЫуSlidityЃЌДњТыШчЯТЃК import cv2img = cv2.imread("26_1.jpg")cv2.imshow("img", img)# зЊЛЛЮЊЛвЖШЭМЯёgray = cv2.cvtColor(img, cv2.COLOR_BGR2GRAY)ret, binary = cv2.threshold(gray, 127, 255, cv2.THRESH_BINARY)contours, hierarchy = cv2.findContours(binary, cv2.RETR_LIST, cv2.CHAIN_APPROX_SIMPLE)x, y, w, h = cv2.boundingRect(contours[0])cntArea=cv2.contourArea(contours[0])#ТжРЊУцЛ§hull=cv2.convexHull(contours[0])hullArea=cv2.contourArea(hull)#ЭЙАќУцЛ§solidity=float(cntArea)/hullAreaprint(solidity)дЫаажЎКѓЃЌБОР§ТжРЊУцЛ§гыЭЙАќУцЛ§ЕФБШжЕsolidityдМЮЊ1ЃК

ЕШаЇжБОЖдкOpenCVжаЃЌЮвУЧЛЙПЩвдЪЙгУЕШаЇжБОЖРДКтСПТжРЊЕФЬиеїжЕЃЌИУжЕЪЧгыТжРЊУцЛ§ЯрЕШЕФдВаЮЕФжБОЖЁЃЦфЪ§бЇМЦЫуЙЋЪНЮЊЃК 
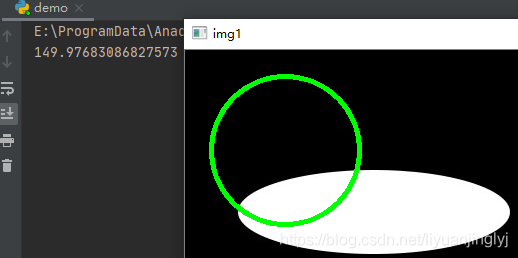
ЯТУцЃЌЮвУЧРДМЦЫугыТжРЊУцЛ§ЯрЕШЕФдВаЮжБОЖЃЌДњТыШчЯТЃК import cv2import numpy as npimg = cv2.imread("26_1.jpg")cv2.imshow("img", img)# зЊЛЛЮЊЛвЖШЭМЯёgray = cv2.cvtColor(img, cv2.COLOR_BGR2GRAY)ret, binary = cv2.threshold(gray, 127, 255, cv2.THRESH_BINARY)contours, hierarchy = cv2.findContours(binary, cv2.RETR_LIST, cv2.CHAIN_APPROX_SIMPLE)x, y, w, h = cv2.boundingRect(contours[0])cntArea=cv2.contourArea(contours[0])#ТжРЊУцЛ§equiDiameter=np.sqrt(4*cntArea/np.pi)print(equiDiameter)cv2.circle(img,(100,100),int(equiDiameter/2),(0,255,0),3)cv2.imshow("img1",img)cv2.waitKey()cv2.destroyAllWindows()дЫаажЎКѓЃЌЮвУЧЕУЕНЦфЕШаЇжБОЖдМЮЊ145ЃК
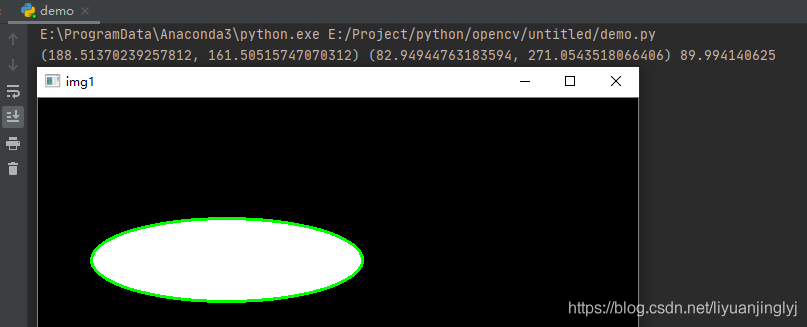
ЗНЯђдкOpenCVжаЃЌКЏЪ§cv2.fitEllipse()ПЩвдгУРДЙЙНЈзюгХФтКЯЭждВЃЌЛЙПЩвддкЗЕЛижЕФкЗжБ№ЗЕЛиЭждВЕФжааФЕуЃЌжсГЄЃЌа§зЊНЧЖШаХЯЂЁЃЪЙгУетжжаЮЪНЃЌФмЙЛжБЙлЕиЛёШЁЭждВЕФЗНЯђЕШаХЯЂЁЃ КЏЪ§cv2.fitEllipse()ЗЕЛижЕЮЊЃК (x,y)ЃКЭждВЕФжааФЕу (MA,ma)ЃКЭждВЫЎЦНЗНЯђжсгыДЙжБЗНЯђжсЕФГЄЖШ angleЃКЭждВЕФа§зЊНЧЖШ import cv2img = cv2.imread("26_1.jpg")cv2.imshow("img", img)# зЊЛЛЮЊЛвЖШЭМЯёgray = cv2.cvtColor(img, cv2.COLOR_BGR2GRAY)ret, binary = cv2.threshold(gray, 127, 255, cv2.THRESH_BINARY)contours, hierarchy = cv2.findContours(binary, cv2.RETR_LIST, cv2.CHAIN_APPROX_SIMPLE)ellipsis=cv2.fitEllipse(contours[0])(x, y), (MA, ma), angle = cv2.fitEllipse(contours[0])print((x, y), (MA, ma), angle)cv2.ellipse(img, ellipsis, (0, 255, 0), 2)cv2.imshow("img1", img)cv2.waitKey()cv2.destroyAllWindows()БОРДОЭЪЧЭждВЭМЃЌЯТУцФтКЯКѓе§КУвВЪЧЭждВЃК
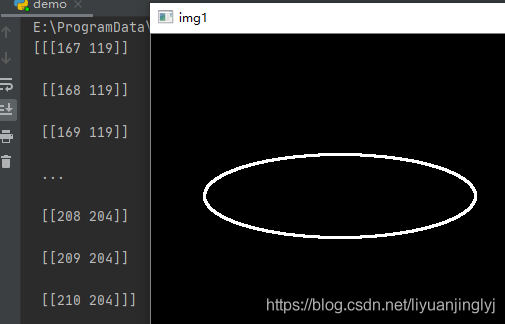
бкУўКЭЯёЫиЕугаЪБКђЃЌЮвУЧЛЙЯёЛёШЁФГЖдЯѓЕФбкУўЭМЯёМАЦфЖдгІЕФЕуЁЃдкOpenCVжаЃЌЫќЛЙЬсЙЉСЫcv2.findNonZero()КЏЪ§гУгкЛёШЁвЛИіЭМЯёФкЕФТжРЊЕуЮЛжУЃЌЦфЭъећЖЈвхШчЯТЃК def findNonZero(src, idx=None): srcЃКвЊВщевЗЧСудЊЫиЕФЭМЯё idxЃКЗЕЛижЕЃЌБэЪОЗЧ0дЊЫиЕФЫїв§ЮЛжУЁЃОпЬхИёЪНЮЊЃЈааКХЃЌСаКХЃЉ ЯТУцЃЌЮвУЧЪЕВтИУКЏЪ§ЃЌДњТыШчЯТЃК import cv2import numpy as npimg = cv2.imread("26_1.jpg")cv2.imshow("img", img)# зЊЛЛЮЊЛвЖШЭМЯёgray = cv2.cvtColor(img, cv2.COLOR_BGR2GRAY)ret, binary = cv2.threshold(gray, 127, 255, cv2.THRESH_BINARY)contours, hierarchy = cv2.findContours(binary, cv2.RETR_LIST, cv2.CHAIN_APPROX_SIMPLE)mask=np.zeros(gray.shape,np.uint8)cv2.drawContours(mask,[contours[0]],0,255,2)pixelpoints=cv2.findNonZero(mask)print(pixelpoints)cv2.imshow("img1", mask)cv2.waitKey()cv2.destroyAllWindows()дЫаажЎКѓЃЌЮвУЧЛсЕУЕНТжРЊЕуЮЛжУЃК
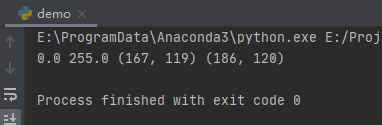
зюДѓжЕЃЌзюаЁжЕвдМАЫќУЧЕФЮЛжУдкOpenCVжаЃЌЫќЬсЙЉcv2.minMaxLoc()КЏЪ§ЛёШЁжИЖЈЖдЯѓФкзюДѓжЕЃЌзюаЁжЕвдМАЮЛжУЕШаХЯЂЃЌЦфЭъећЖЈвхШчЯТЃК def minMaxLoc(src, mask=None): srcЃКЕЅЭЈЕРЭМЯё maskЃКбкУўЃЌЭЈЙ§ЪЙгУбкУўЭМЯёЃЌЕУЕНбкФЄжИЖЈЧјгђФкЕФзюжЕаХЯЂ ИУКЏЪ§ЗЕЛи4ИіжЕЃКзюаЁжЕЃЌзюДѓжЕЃЌзюаЁжЕЮЛжУЃЌзюДѓжЕЮЛжУЁЃ ЯТУцЃЌЮвУЧРДЛёШЁетаЉжЕЃЌДњТыШчЯТЃК import cv2import numpy as npimg = cv2.imread("26_1.jpg")cv2.imshow("img", img)# зЊЛЛЮЊЛвЖШЭМЯёgray = cv2.cvtColor(img, cv2.COLOR_BGR2GRAY)ret, binary = cv2.threshold(gray, 127, 255, cv2.THRESH_BINARY)contours, hierarchy = cv2.findContours(binary, cv2.RETR_LIST, cv2.CHAIN_APPROX_SIMPLE)mask = np.zeros(gray.shape, np.uint8)cv2.drawContours(mask, [contours[0]], 0, 255, 2)min, max, min_loc, max_loc = cv2.minMaxLoc(gray, mask)print(min, max, min_loc, max_loc)дЫаажЎКѓЃЌПижЦЬЈЪфГі4ИіжЕЃК
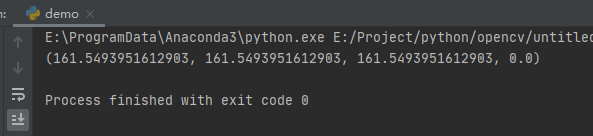
ЦНОљбеЩЋМАЦНОљЛвЖШдкOpenCVжаЃЌЫќИјЮвУЧЬсЙЉcv2.mean()КЏЪ§МЦЫувЛИіЖдЯѓЕФЦНОљбеЩЋгыЦНОљЛвЖШЁЃЦфЭъећЖЈвхШчЯТЃК def mean(src, mask=None): ВЮЪ§гыЩЯУцСНИіаЁНквЛбљЃЌетРяВЛдкзИЪіЁЃЯТУцЃЌЮвУЧРДЪЙгУетИіКЏЪ§ЃЌДњТыШчЯТЃК import cv2import numpy as npimg = cv2.imread("26_1.jpg")cv2.imshow("img", img)# зЊЛЛЮЊЛвЖШЭМЯёgray = cv2.cvtColor(img, cv2.COLOR_BGR2GRAY)ret, binary = cv2.threshold(gray, 127, 255, cv2.THRESH_BINARY)contours, hierarchy = cv2.findContours(binary, cv2.RETR_LIST, cv2.CHAIN_APPROX_SIMPLE)mask=np.zeros(gray.shape,np.uint8)cv2.drawContours(mask,[contours[0]],0,255,2)mean=cv2.mean(img,mask)дЫаажЎКѓЃЌЪфГі4ИіжЕЃКRGBвдМАAЭЈЕРЕФОљжЕЃК
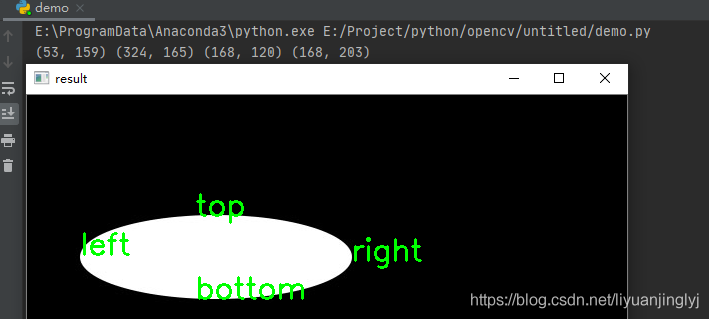
МЋЕугаЪБКђЃЌЮвУЧЯЃЭћЛёШЁФГИіЖдЯѓФкЕФМЋЕуЃЌБШШчзюзѓЃЌзюгвЃЌзюЩЯЃЌзюЯТЕШЁЃдкOpenCVжаЃЌЫќИјЮвУЧЬсЙЉСЫвдЯТЗНЗЈНјааЛёШЁЃК left=tuple(cnt[cnt[:,:,0].argmin()][0])right=tuple(cnt[cnt[:,:,0].argmax()][0])top=tuple(cnt[cnt[:,:,1].argmin()][0])bottom=tuple(cnt[cnt[:,:,1].argmax()][0]) ЯТУцЃЌЮвУЧРДЭЈЙ§етаЉЗНЗЈЛёШЁЃЌДњТыШчЯТЃК import cv2import numpy as npimg = cv2.imread("26_1.jpg")cv2.imshow("img", img)# зЊЛЛЮЊЛвЖШЭМЯёgray = cv2.cvtColor(img, cv2.COLOR_BGR2GRAY)ret, binary = cv2.threshold(gray, 127, 255, cv2.THRESH_BINARY)contours, hierarchy = cv2.findContours(binary, cv2.RETR_LIST, cv2.CHAIN_APPROX_SIMPLE)mask = np.zeros(img.shape, np.uint8)cnt = contours[0]left = tuple(cnt[cnt[:, :, 0].argmin()][0])right = tuple(cnt[cnt[:, :, 0].argmax()][0])top = tuple(cnt[cnt[:, :, 1].argmin()][0])bottom = tuple(cnt[cnt[:, :, 1].argmax()][0])print(left, right, top, bottom)font = cv2.FONT_HERSHEY_SIMPLEXcv2.putText(img, "left", left, font, 1, (0, 255, 0), 2)cv2.putText(img, "right", right, font, 1, (0, 255, 0), 2)cv2.putText(img, "top", top, font, 1, (0, 255, 0), 2)cv2.putText(img, "bottom", bottom, font, 1, (0, 255, 0), 2)cv2.imshow("result",img)cv2.waitKey()cv2.destroyAllWindows()дЫаажЎКѓЃЌжЕгыаЇЙћШчЯТЃК
ЕНДЫетЦЊЙигкOpenCV-PythonЪЕЯжТжРЊЕФЬиеїжЕЕФЮФеТОЭНщЩмЕНетСЫ,ИќЖрЯрЙиOpenCV ТжРЊЕФЬиеїжЕФкШнЧыЫбЫї51zixue.netвдЧАЕФЮФеТЛђМЬајфЏРРЯТУцЕФЯрЙиЮФеТЯЃЭћДѓМввдКѓЖрЖржЇГж51zixue.netЃЁ
дйвВВЛгУЛЈЧЎТђТўЛ!PythonХРШЁФГТўЛЕФНХБОМАдДТы
OpenCV-PythonЪЕЯжЛГОЩТЫОЕгыСЌЛЗЛТЫОЕ |


