这篇教程Python实现网络自动化eNSP写得很实用,希望能帮到您。
1.使用Paramiko登陆到单台交换机
实验拓扑云彩桥接到本机环回接口:192.168.1.1/24
三层交换机IP:192.168.1.2/24

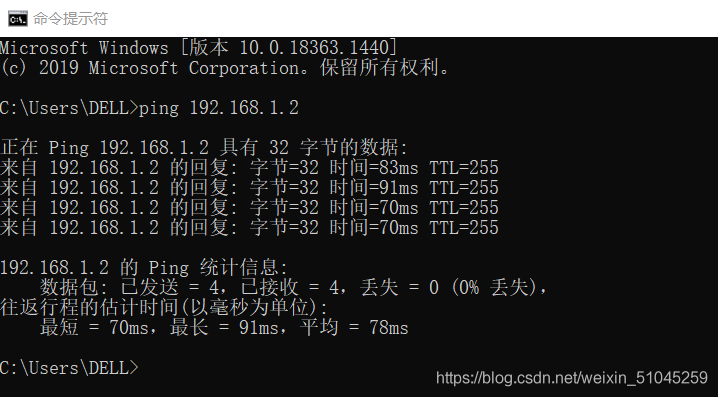
实验要求使用Python Paramiko 模块实现SSH 登录单个交换机(192.168.56.2/24),配置LoopBack0地址:1.1.1.1/32。配置完成后,保存退出。 实验步骤 配置交换机管理地址,并测试与主机虚拟网卡连通性 [Huawei]vlan 10[Huawei]int vlan 10[Huawei-Vlanif10]ip add 192.168.1.2 24[Huawei-GigabitEthernet0/0/1]port link-type access [Huawei-GigabitEthernet0/0/1]port default vlan 10 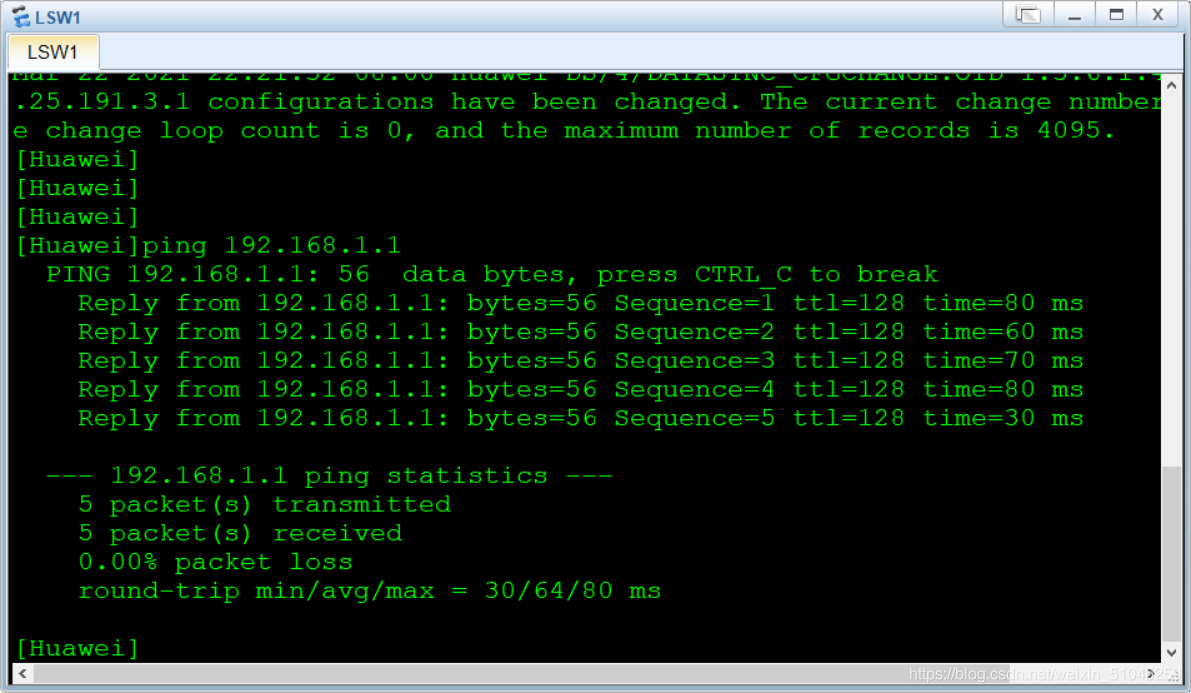
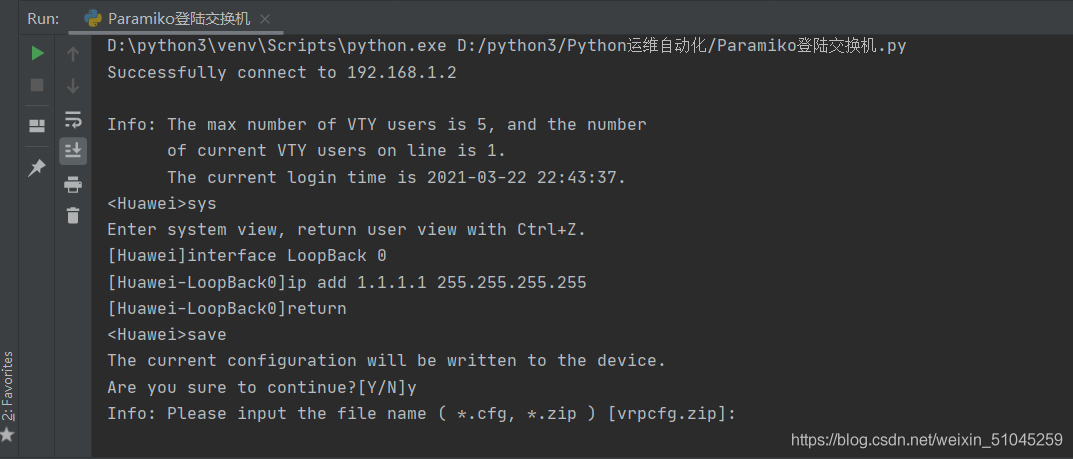
配置三层交换机开启 SSH 服务端,配置 SSH 账号密码。 [Huawei]user-interface vty 0 4[Huawei-ui-vty0-4]authentication-mode aaa[Huawei-ui-vty0-4]protocol inbound ssh[Huawei-aaa]local-user python password cipher 123[Huawei-aaa]local-user python privilege level 3[Huawei-aaa]local-user python service-type ssh [Huawei]stelnet server enable [Huawei]ssh authentication-type default password Python代码 import paramikoimport timeip = '192.168.56.2'username = 'python'password = '123'ssh_client = paramiko.SSHClient()ssh_client.set_missing_host_key_policy(paramiko.AutoAddPolicy()) //默认情况下,Paramiko会拒绝任何未知的SSH public keys,使用此函数使其接收来自交换机提供的public keys。ssh_client.connect(hostname=ip, username=username, password=password, look_for_keys=False)print('Successfully connect to ' + ip)commend = ssh_client.invoke_shell()commend.send('sys/n')commend.send('interface LoopBack 0/n')commend.send('ip add 1.1.1.1 255.255.255.255/n')commend.send('return/n')commend.send('save/n')commend.send('y/n')time.sleep(3) //稍等3秒,然后执行以下操作output = commend.recv(65535) //截取本次运行script后的所有输出记录,将其assign给output变量print(output.decode("ascii"))ssh_client.close()查看运行结果
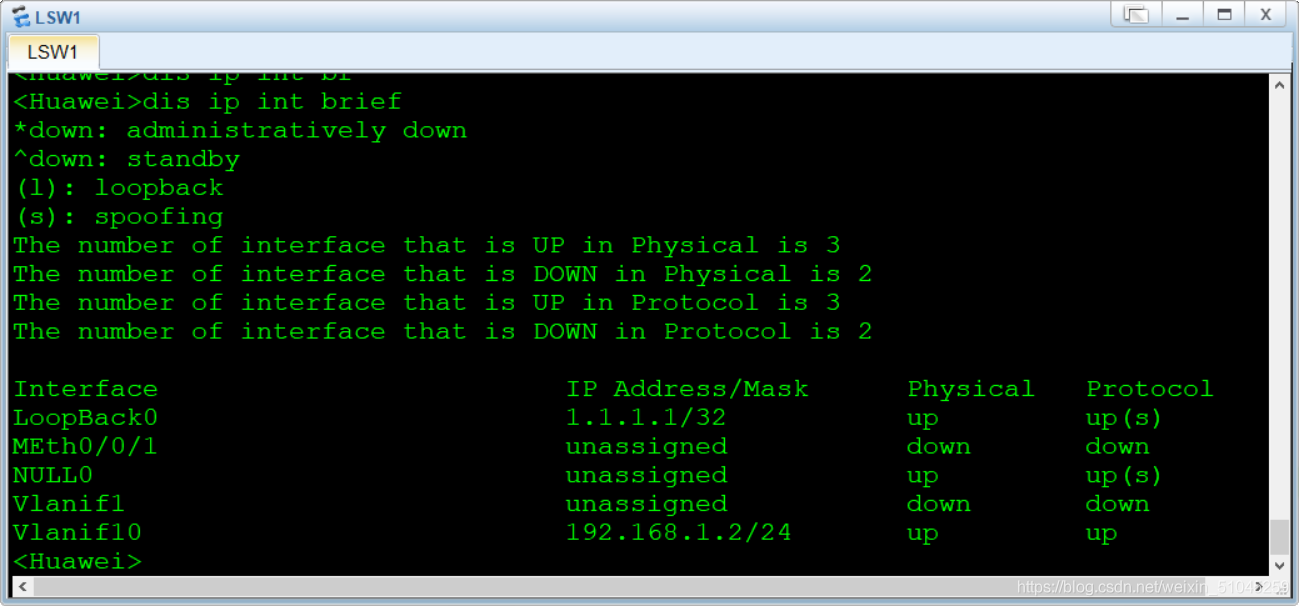
在交换机上查看
也可以在交换机上debuggiing ip packet可以看到日志
2.使用Paramiko登陆到连续子网交换机实验拓扑连续子网三层交换机:管理地址 192.168.1.2/24 to 192.168.1.5/24 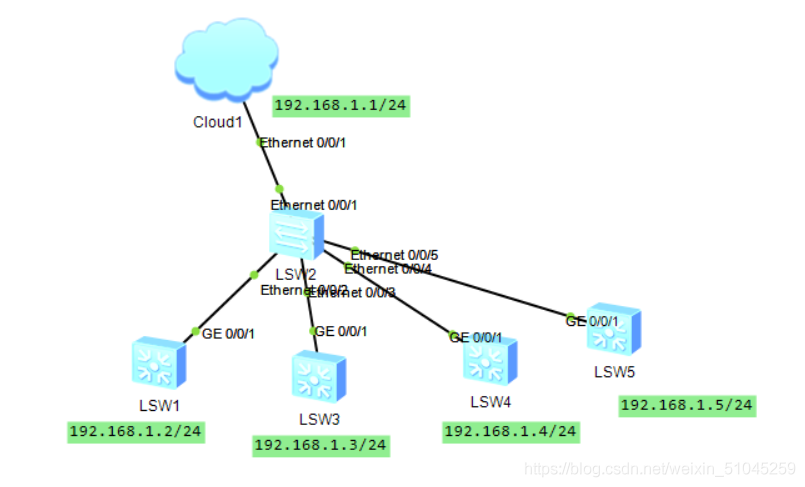
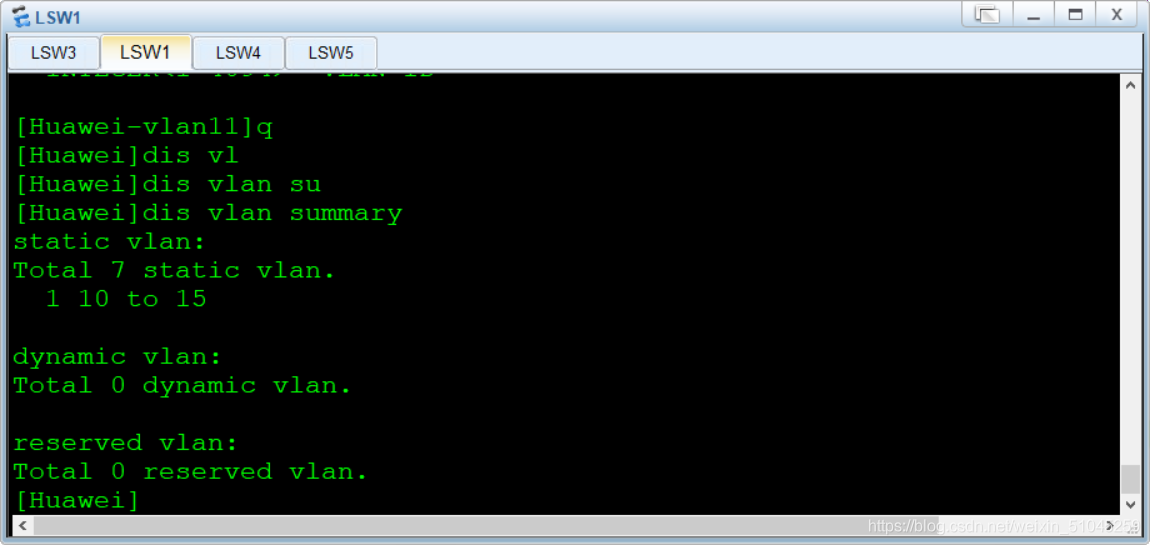
实验要求登陆到各台交换机,并为其配置vlan 11 to 15,保存配置并退出。
实验步骤配置管理口IP地址,并配置SSH Server 登陆名以及密码等 python代码 import paramikoimport time#import getpass#username = input('Username: ')#password = getpass.getpass('Password: ') //pycharm中该模块运行没反应,用户名和密码还是直接写的username = 'python'password = '123'for i in range(2, 6): ip = '192.168.1.' + str(i) ssh_client = paramiko.SSHClient() ssh_client.set_missing_host_key_policy(paramiko.AutoAddPolicy()) ssh_client.connect(hostname=ip, username=username, password=password, look_for_keys=False) command = ssh_client.invoke_shell() print('Successfully connect to ' + ip) command.send('sys/n') for j in range(11, 16): print('正在创建VLAN: ' + str(j)) command.send('vlan ' + str(j) + '/n') time.sleep(1) command.send('return/n') command.send('save/n') command.send('y/n') time.sleep(2) output = command.recv(65535).decode('ascii') print(output)ssh_client.close()运行结果 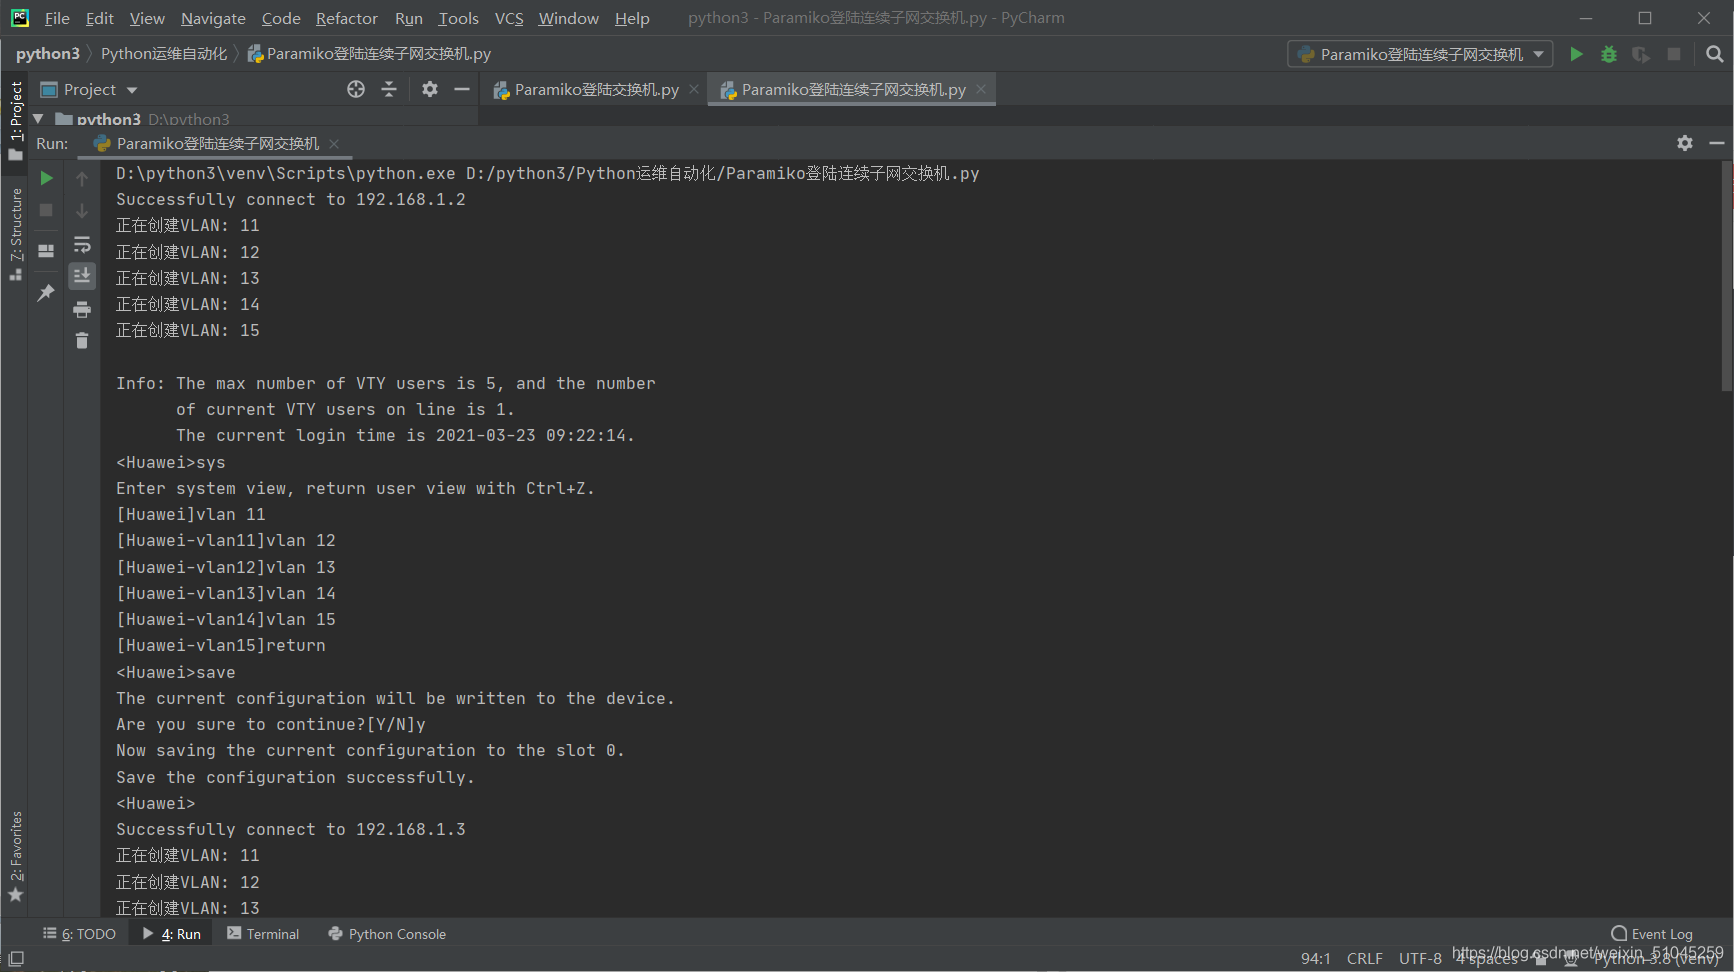
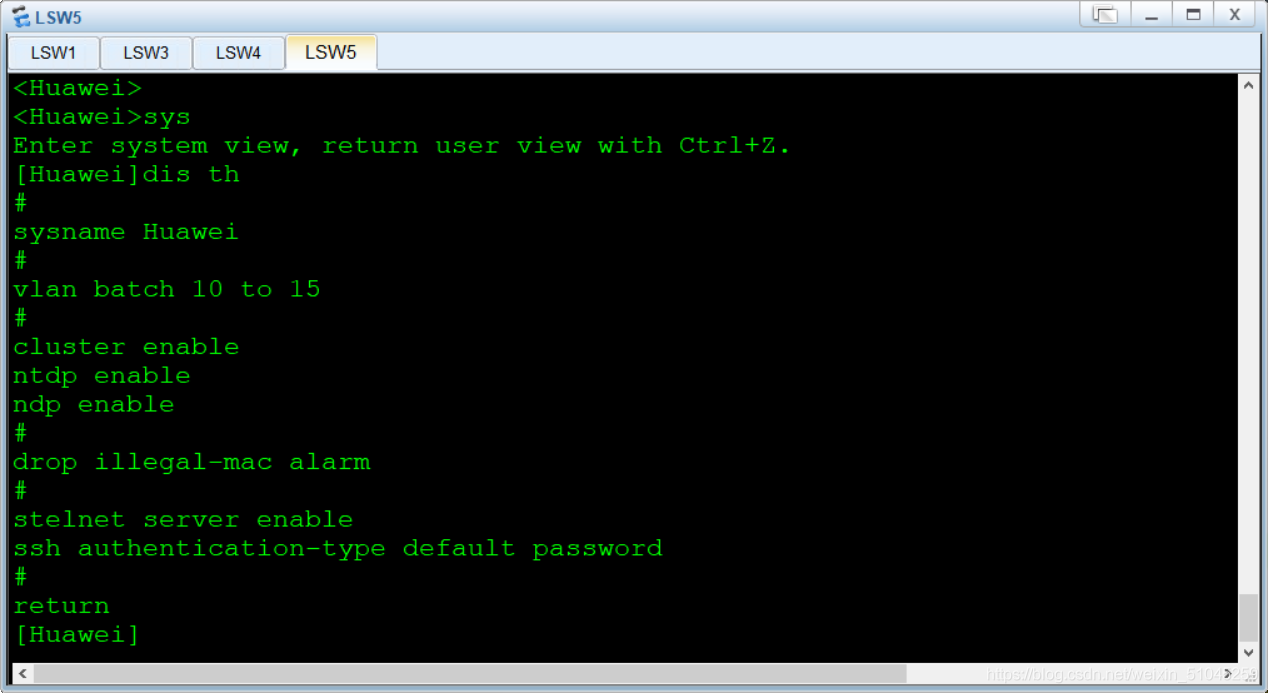
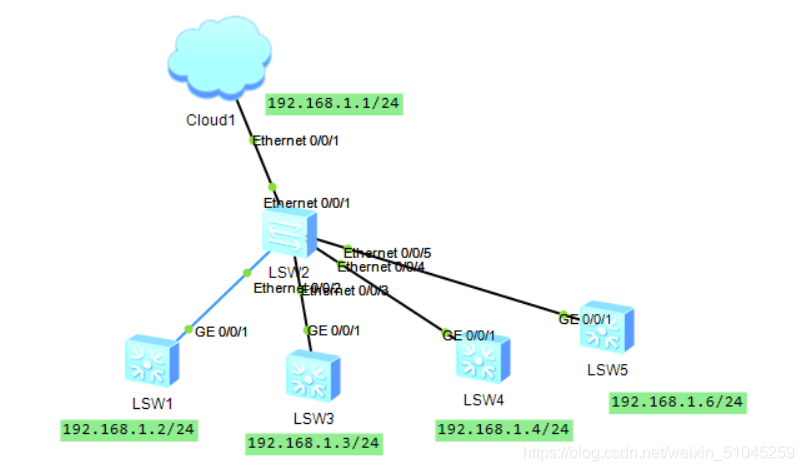
3.Paramiko登陆不连续子网交换机实验拓扑将交换机LSW5的管理接口ip更改为192.168.1.6/24,使交换机ip不在同一网段

实验要求使用Paramiko登陆四台ip不连续的交换机,并给其配置vlan11 to 15 实验步骤 创建一个文本文档,将需要配置的交换机的ip地址写入,这里我在Desktop下创建了一个名为ip.txt文档 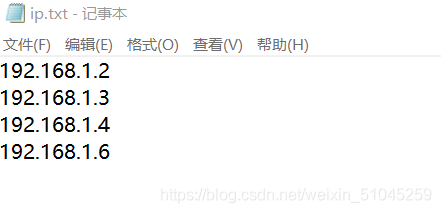
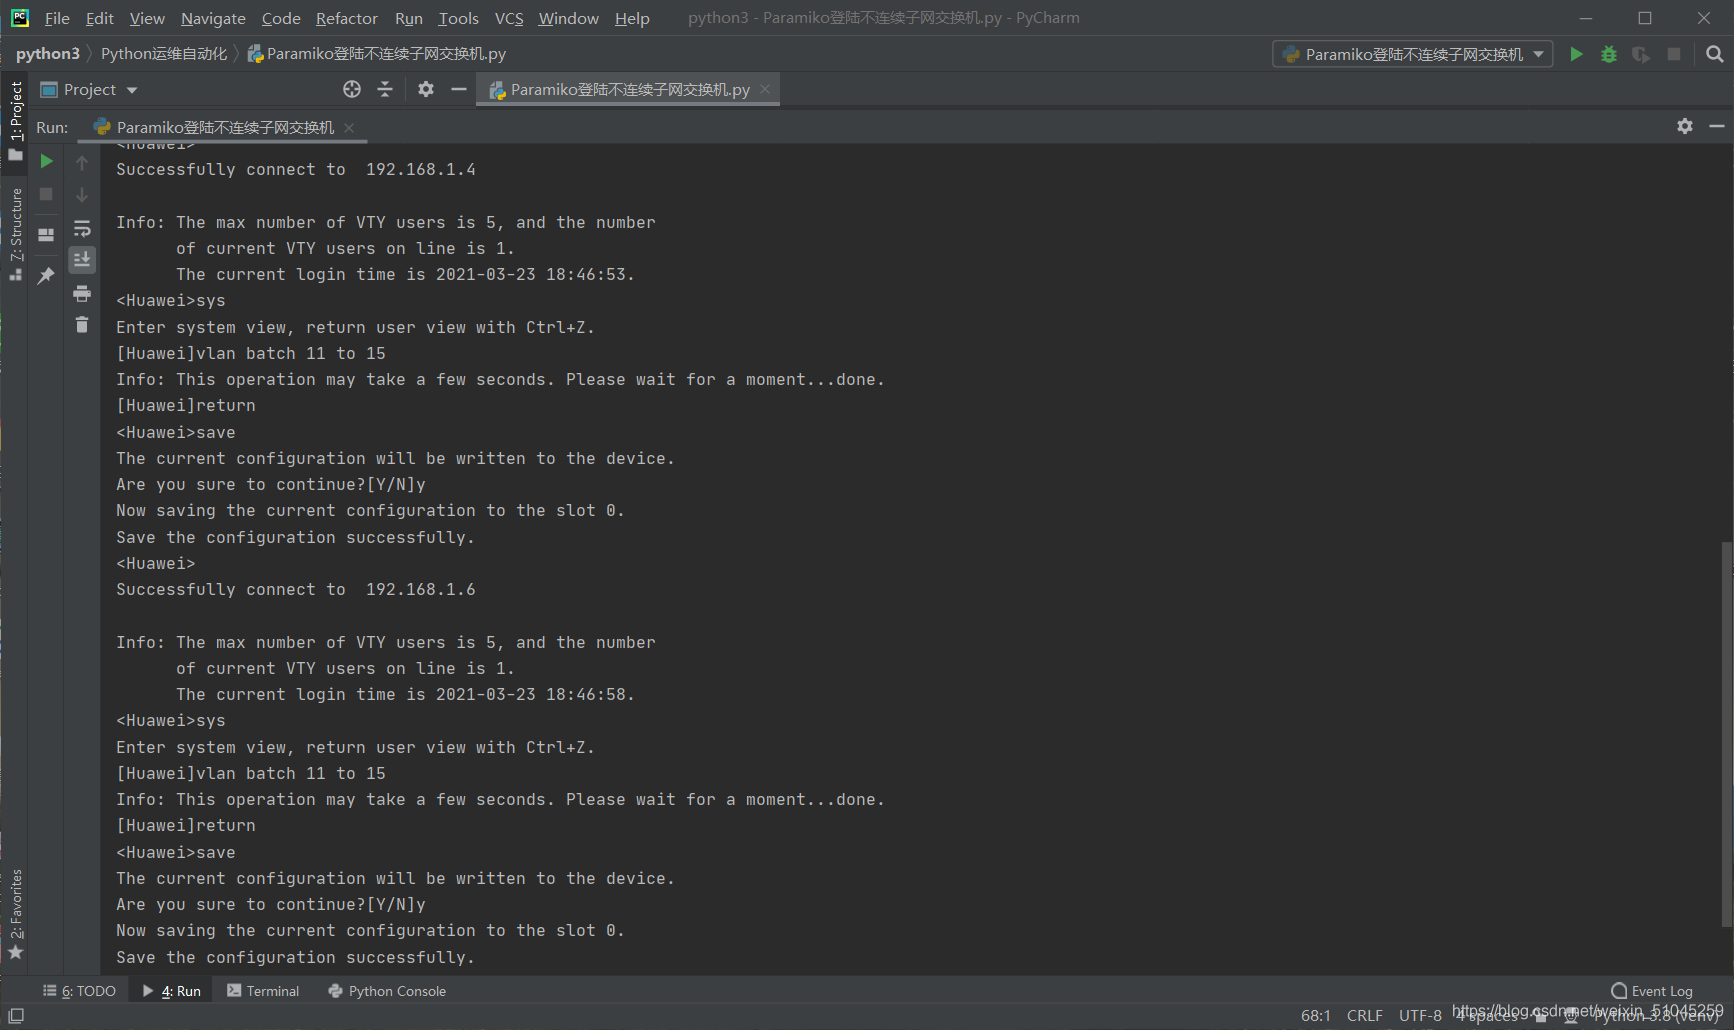
使用open函数,打开文件,进行操作,实现不连续子网调用 import paramikoimport timeusername = 'python'password = '123'f = open('C:/Users/DELL/Desktop/ip.txt', 'r')for line in f.readlines(): ip = line.strip() ssh_client = paramiko.SSHClient() ssh_client.set_missing_host_key_policy(paramiko.AutoAddPolicy()) ssh_client.connect(hostname=ip, username=username, password=password) print('Successfully connect to ', ip) command = ssh_client.invoke_shell() command.send('sys/n') command.send('vlan batch 11 to 15/n') time.sleep(2) command.send('return/n') command.send('save/n') command.send('y/n') time.sleep(2) output = command.recv(65535).decode('ascii') print(output)f.close()ssh_client.close()查看运行结果 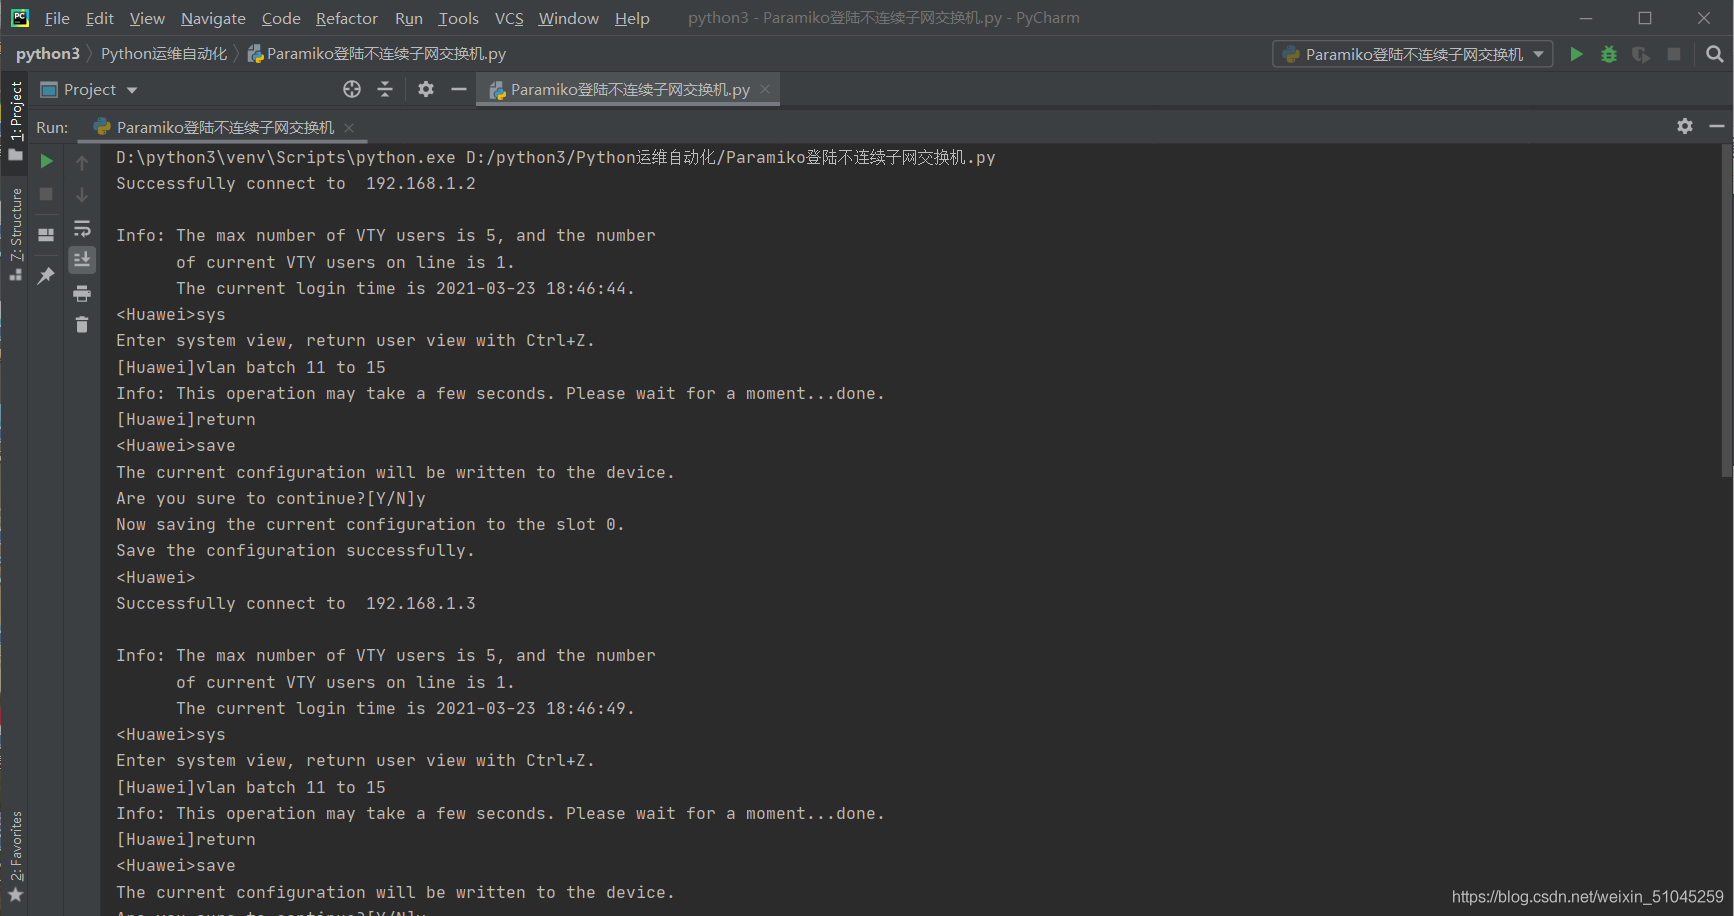
4.sys.argv[ ] 实现灵活调用脚本所需文件实验拓扑假设1.2和1.3为一组,1.4和1.6为一组
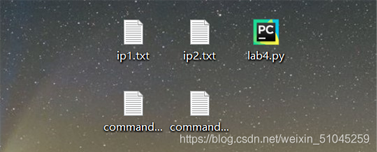
实验要求同时修改不同型号设备的配置,给SW1/3配置vlan11 to 15,SW4/5配置vlan16 to 20 实验步骤创建两个名为ip1.txt,command1.txt的文件,存储1组的ip和要进行的配置 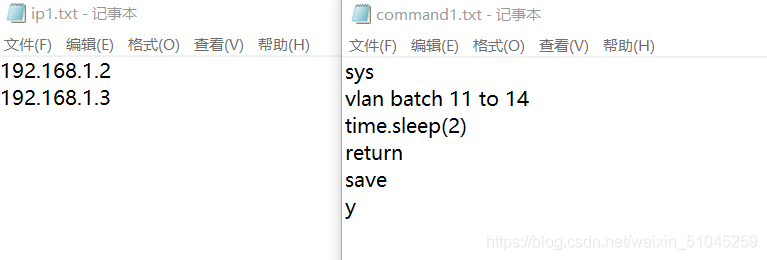
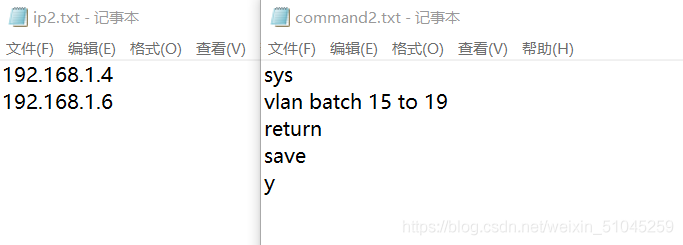
同样创建两个名为ip2.txt,command2.txt文件,存储2组的ip和要进行的配置
python代码 import paramikoimport timeimport sysusername = 'python'password = '123'ip_file = sys.argv[1]cmd_file = sys.argv[2]iplist = open(ip_file)for line in iplist.readlines(): ip = line.strip() ssh_client = paramiko.SSHClient() ssh_client.set_missing_host_key_policy(paramiko.AutoAddPolicy()) ssh_client.connect(hostname=ip, username=username, password=password) print('Successfully connect to ', ip) command = ssh_client.invoke_shell() cmdlist = open(cmd_file, 'r') cmdlist.seek(0) for line in cmdlist.readlines(): command.send(line + '/n') time.sleep(5) cmdlist.close() output = command.recv(65535) print(output)iplist.close()ssh_client.close()查看运行结果(pycharm不可以使用argv,在cmd里使用) 
5.SSH连接失败处理import paramikoimport timeimport sysimport socketimport getpassusername = input('Username: ')password = getpass.getpass('Password: ')ip_file = sys.argv[1]cmd_file = sys.argv[2]switch_with_authentication_issue = []switch_not_reachable = []iplist = open(ip_file, 'r')for line in iplist.readlines(): try: ip = line.strip() ssh_client = paramiko.SSHClient() ssh_client.set_missing_host_key_policy(paramiko.AutoAddPolicy()) ssh_client.connect(hostname=ip, username=username, password=password,look_for_keys=False) print('Successfully connect to ' + ip) command = ssh_client.invoke_shell() cmdlist = open(cmd_file, 'r') cmdlist.seek(0) for cmd in cmdlist.readlines(): command.send(cmd + '/n') time.sleep(1) cmdlist.close() output = command.recv(65535) print(output.decode("ascii")) except paramiko.ssh_exception.AuthenticationException: print('User authentication failed for ' + ip + '.') switch_with_authentication_issue.append(ip) except TimeoutError: switch_not_reachable.append(ip)iplist.close()ssh_client.close()print('/nUser authentication failed for below switches: ')for i in switch_with_authentication_issue: print(i)print('/nBelow switchs are not reachable: ')for i in switch_not_reachable: print(i)到此这篇关于Python实现网络自动化eNSP的实现的文章就介绍到这了,更多相关Python 网络自动化 内容请搜索51zixue.net以前的文章或继续浏览下面的相关文章希望大家以后多多支持51zixue.net!
Python脚本文件外部传递参数的处理方法
pytorch中LN(LayerNorm)及Relu和其变相的输出操作 |


