íãóˆ§ä°äpythonøÅTkinteròçüøñøØ°Ýõúˋçáòƒâ»ÇºôŠÅÇçû¤ÉòçÆûȘüÈë«áɯÿç§áºÀÈ
TkinteròçüøUIñøØ°ÝõúˋüåòƒÈ¤
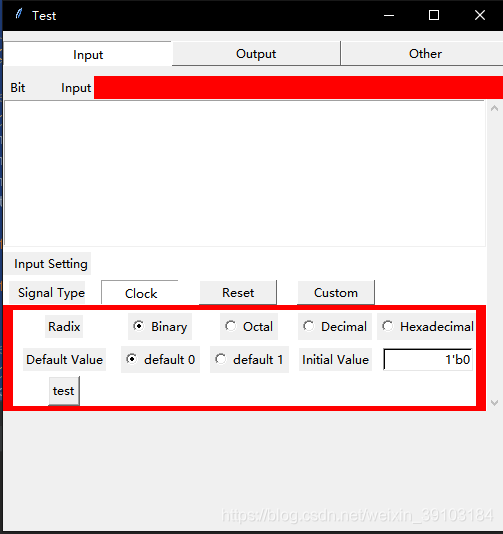
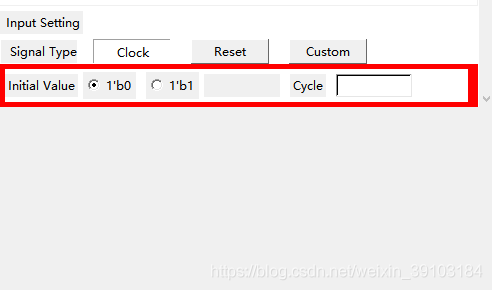
InputذȘ¤šè¨ý¢ñøöˆçÝú¯Frameçáö£øûȘüô¯Šý¢ñøöˆçÖأذçáæÆÝõúˋÈ£à»Ø°ÝõúˋçáüåòƒáÖàý£üÁë˜ÀÈòçüøñøØ°üåòƒçá¤ùÅáæÕ¥±öˆRadiobuttonȘRadiobuttonø£ÆÅØ£¡—îÀüŸáÉ¿£èºÅÏȘò¿Æûýöò»indicatoron=0áÉ¿£§¨RadiobuttonüåòƒöˆButtonçáÅöæÇȘ봿»îÀÑ´çáRadiobutton§¨åÙÆÅçáFrame forgetç¶È˜ë˜òÝȘ§¨åÊÑ´çáFrame packȘòçüøñøØ°çáÅÏ¿«ÀÈò¿ÆûòÝ؈§¨¡■££çáæÕ¥±ñéàŠØ£¡—FrameøÅȘѴØÍØ£¡—¤₤ò»§½ÅÅîÀÑ´Radiobuttonçáýöò»Ç¨çïȘòçüøúÅ££ÀÈàÓ¿«ÑåRadiobuttonò¿ÆûbindçᣯȘçÝú¯îÀÑ´çáRadiobuttonø£áÉåÖüôÇöòô¥±ÇËñÂòÝèºÅÏȘò¥øíô»æéØ£éáȘùªØåò¿ÆûcommandîÀüŸ¡°øçÝõúˋúÅ££¤₤ò»ÀÈ
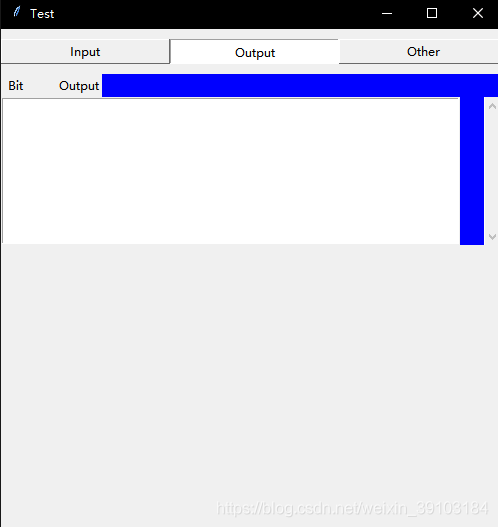
çÖѱذOutput
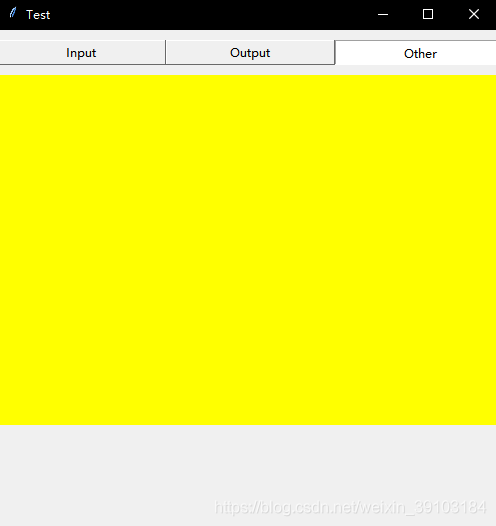
çÖà»Ø°Ohter
çÖأذçáæÆÝõúˋȘñøöˆà»ý¢ñøȘû¢Ø°çááÖàïÑâêÂ

åÇôŠàÓüôȤ import tkinter as tkclass TestBenchMaker: def __init__(self): self.TITLE = "Test" self.WIDTH = 500 self.HEIGHT = 500 self.parseDic = {} # Initial GUI def initialGUI(self): # Change tag def changeTag(tag): frame3.pack_forget() frame4.pack_forget() frame5.pack_forget() if tag == 0: frame3.pack(fill=tk.X) elif tag == 1: frame4.pack(fill=tk.X) elif tag == 2: frame5.pack(fill=tk.X) # Change type def changeType(tag): clockSet.pack_forget() resetSet.pack_forget() customSet.pack_forget() if tag == 0: clockSet.pack(side=tk.TOP, fill=tk.BOTH, expand=tk.YES, pady=5, padx=10) elif tag == 1: resetSet.pack(side=tk.TOP, fill=tk.BOTH, expand=tk.YES, pady=5, padx=10) elif tag == 2: customSet.pack(side=tk.TOP, fill=tk.BOTH, expand=tk.YES, pady=5, padx=10) window = tk.Tk() window.title(self.TITLE) # Place GUI on the center of screen self.ws = window.winfo_screenwidth() self.hs = window.winfo_screenheight() x = (self.ws / 2) - (self.WIDTH / 2) y = (self.hs / 2) - (self.HEIGHT / 2) window.geometry('%dx%d+%d+%d' % (self.WIDTH, self.HEIGHT, x, y)) # Tag: 0 --> input; 1 --> output; 2 --> other frame2 = tk.Frame(window) frame2.pack(fill=tk.Y, pady=10) tag = tk.IntVar() tagWidth = 23 tk.Radiobutton(frame2, text="Input", command=lambda: changeTag(0), width=tagWidth, variable=tag, value=0, bd=1, indicatoron=0).grid(column=0, row=1) tk.Radiobutton(frame2, text="Output", command=lambda: changeTag(1), variable=tag, width=tagWidth, value=1, bd=1, indicatoron=0).grid(column=1, row=1) tk.Radiobutton(frame2, text="Other", command=lambda: changeTag(2), variable=tag, width=tagWidth, value=2, bd=1, indicatoron=0).grid(column=2, row=1) # frame3 --> Input # Signal info frame3 = tk.Frame(window, height=300, bg="red") frame3.pack(side=tk.TOP, fill=tk.X) tk.Label(frame3, text=" Bit Input").pack(side=tk.TOP, anchor=tk.W) scroll = tk.Scrollbar(frame3) scroll.pack(side=tk.RIGHT, fill=tk.Y) self.inputBox = tk.Listbox(frame3, bd=1, selectmode=tk.SINGLE, yscrollcommand=scroll.set, height=8) self.inputBox.pack(side=tk.TOP, anchor=tk.NW, fill=tk.X, expand=tk.YES) scroll.config(command=self.inputBox.yview) # Input setting width = 10 frameInputSet = tk.Frame(frame3, bg="white") frameInputSet.pack(side=tk.TOP, fill=tk.BOTH, expand=tk.YES) tk.Label(frameInputSet, text=" Input Setting").grid(row=0, column=0, pady=5) tk.Label(frameInputSet, text=" Signal Type", width=width).grid(row=1, column=0) # Tpye: 0 --> clock; 1 --> reset; 2 --> custom type = tk.IntVar() tk.Radiobutton(frameInputSet, text="Clock", variable=type, value=0, command=lambda:changeType(0), bd=1, indicatoron=0, width=width).grid(row=1, column=1, padx=10) tk.Radiobutton(frameInputSet, text="Reset", variable=type, value=1, command=lambda:changeType(1), bd=1, indicatoron=0, width=width).grid(row=1, column=2, padx=10) tk.Radiobutton(frameInputSet, text="Custom", variable=type, value=2, command=lambda:changeType(2), bd=1, indicatoron=0, width=width).grid(row=1, column=3, padx=10) # Clock setting initalValue = tk.StringVar() initalValue.set("1'b0") cycle = tk.StringVar() converse = tk.StringVar() clockSet = tk.Frame(frame3, bg="white") #clockSet.pack(side=tk.TOP, fill=tk.BOTH, expand=tk.YES, pady=5, padx=10) tk.Label(clockSet, text="Initial Value").grid(row=0, column=0, pady=5) tk.Radiobutton(clockSet, text="1'b0", variable=initalValue, value="1'b0").grid(row=0, column=1, padx=5) tk.Radiobutton(clockSet, text="1'b1", variable=initalValue, value="1'b1").grid(row=0, column=2, padx=5) tk.Label(clockSet, text="", width=10).grid(row=0, column=3) tk.Label(clockSet, text="Cycle").grid(row=0, column=4, pady=5, padx=10) tk.Entry(clockSet, textvariable=cycle, width=10, bd=2, bg="white").grid(row=0, column=5) # Reset setting resetSet = tk.Frame(frame3, bg="white") tk.Label(resetSet, text="Initial Value").grid(row=0, column=0, pady=5) tk.Radiobutton(resetSet, text="1'b0", variable=initalValue, value="1'b0").grid(row=0, column=1, padx=5) tk.Radiobutton(resetSet, text="1'b1", variable=initalValue, value="1'b1").grid(row=0, column=2, padx=5) tk.Label(resetSet, text="", width=10).grid(row=0, column=3) tk.Label(resetSet, text="Converse").grid(row=0, column=4, pady=5, padx=10) tk.Entry(resetSet, textvariable=converse, width=10, bd=2, bg="white").grid(row=0, column=5) # Custom setting defaultValue = tk.IntVar() radixValue = tk.IntVar() radixValue.set(0) customSet = tk.Frame(frame3, bg="white") customSet.pack(side=tk.TOP, fill=tk.BOTH, expand=tk.YES, pady=5, padx=10) # Radix 0 --> b, 1 --> o, 2 --> d, 3 --> h tk.Label(customSet, text="Radix").grid(row=0, column=0, pady=5, padx=1) tk.Radiobutton(customSet, text="Binary", variable=radixValue, value=0).grid(row=0, column=1) tk.Radiobutton(customSet, text="Octal", variable=radixValue, value=1).grid(row=0, column=2) tk.Radiobutton(customSet, text="Decimal", variable=radixValue, value=2).grid(row=0, column=3) tk.Radiobutton(customSet, text="Hexadecimal", variable=radixValue, value=3).grid(row=0, column=4) # Initial value tk.Label(customSet, text="Default Value").grid(row=1, column=0, pady=5, padx=10) tk.Radiobutton(customSet, text="default 0", variable=defaultValue, value=0).grid(row=1, column=1, padx=5) tk.Radiobutton(customSet, text="default 1", variable=defaultValue, value=1).grid(row=1, column=2, padx=5) tk.Label(customSet, text="Initial Value").grid(row=1, column=3, pady=5, padx=5) tk.Entry(customSet, textvariable=initalValue, width=12, bd=2, bg="white", justify=tk.RIGHT).grid(row=1, column=4) tk.Button(customSet, text="test", command=lambda :print(initalValue.get())).grid() # frame4 --> Output frame4 = tk.Frame(window, height=350, bg="blue") tk.Label(frame4, text=" Bit Output").pack(anchor=tk.NW) scroll2 = tk.Scrollbar(frame4) scroll2.pack(side=tk.RIGHT, fill=tk.Y) self.outputBox = tk.Listbox(frame4, bd=1, selectmode=tk.SINGLE, yscrollcommand=scroll2.set, height=8, width=65) self.outputBox.pack(side=tk.LEFT) scroll2.config(command=self.outputBox.yview) # frame5 --> Other frame5 = tk.Frame(window, height=350, bg="yellow") window.mainloop()if __name__ == "__main__": tbm = TestBenchMaker() tbm.initialGUI()ç§Çùíãóˆ¿ÄÆÖpythonøÅTkinteròçüøñøØ°Ýõúˋçáòƒâ»ÇºôŠçáöáíôƒë§ÕèÉç§íãêù,¡■ÑÁüÁ¿Äpython TkinterñøØ°ÝõúˋáÖàïúŠùîù¼51zixue.netØåú¯çáöáíô£·¥äŽð₤ââüôûÌçáüÁ¿ÄöáíôüÈë«Çµ¥ØØ夵ÑÁÑÁøÏ°ø51zixue.netÈÀ
PythonéâàÀë½Ø°çáùªÆÅáÖëãêÇçáǺôŠ
pytorchòçüøôÔ¥Ù£Ä¿Õ |


