这篇教程Python+uiautomator2实现手机锁屏解锁功能写得很实用,希望能帮到您。
业务需求:需要测试手机滑动解锁失败时事件的次数及等待的时间,本来想利用Python+Appium实现,但是Appium运行时自动给我解锁了.... 部分解释摘抄自:https://testerhome.com/topics/11357 python-uiautomator2是一个自动化测试开源工具,仅支持Android平台的原生应用测试 python-uiautomator2封装了谷歌自带的uiautomator2测试框架,提供便利的python接口。他允许测试人员直接在PC上编写Python的测试代码,操作手机应用,完成自动化,大大提高了自动化代码编写的效率 以下图片使用Windows画图软件 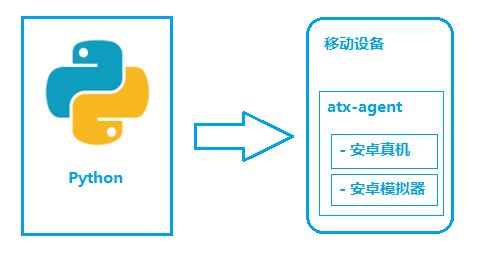
如图所示,python-uiautomator2主要分为两个部分,python客户端,移动设备 - python端: 运行脚本,并向移动设备发送HTTP请求
- 移动设备:移动设备上运行了封装了uiautomator2的HTTP服务,解析收到的请求,并转化成uiautomator2的代码。
整个过程 - 在移动设备上安装
atx-agent(守护进程), 随后atx-agent启动uiautomator2服务(默认7912端口)进行监听 - 在PC上编写测试脚本并执行(相当于发送HTTP请求到移动设备的server端)
- 移动设备通过WIFI或USB接收到PC上发来的HTTP请求,执行制定的操作
安装工具 - Python2或者Python3均可。(也可以尝试使用Android上Python客户端:QPython)
- 移动设备
环境搭建安装adb 如命令行可以执行adb devices,则跳过此步骤
从谷歌官网下载Android Platform Tools https://developer.android.com/studio/releases/platform-tools.html,解压,并加包含adb.exe的目录加入到系统的PATH中。 安装python-uiautomator2 pip install --pre -U uiautomator2 设备安装atx-agent 首先设备连接到PC,并能够adb devices发现该设备。 # 从github下载atx-agent文件,并推送到手机。在手机上安装包名为`com.github.uiautomator`的apk$ python -m uiautomator2 initsuccess 最后提示success,代表atx-agent初始化成功。 应用及操作调用uiautomator2的过程 - 配置手机设备参数,设置具体操作的是哪一台手机
- 抓取手机上应用的控件,制定对应的控件来进行操作
- 对抓取到的控件进行操作,比如点击、填写参数等。
配置手机设备参数 python-uiautomator2连接手机的方式有两种,一种是通过WIFI,另外一种是通过USB。两种方法各有优缺点。
WIFI最便利的地方要数可以不用连接数据线,USB则可以用在PC和手机网络不在一个网段用不了的情况。 1,使用WIFI连接 手机获取到手机的IP,并确保电脑可以PING通手机。手机的IP可以在设置-WIFI设置里面获取到。
比如手机的IP是192.168.0.100,连接设备的代码为 import uiautomator2 as u2d = u2.connect('192.168.0.100')2.使用USB连接 手机的序列号可以通过adb devices获取到,假设序列号是123456f,连接代码为 import uiautomator2 as u2d = u2.connect_usb('123456f')抓取手机上应用的控件 我这里使用的weditor, 1.终端中输入 pip install weditor安装weditor 2.终端中输入python -m weditor启动weditor 下图为网页的截图 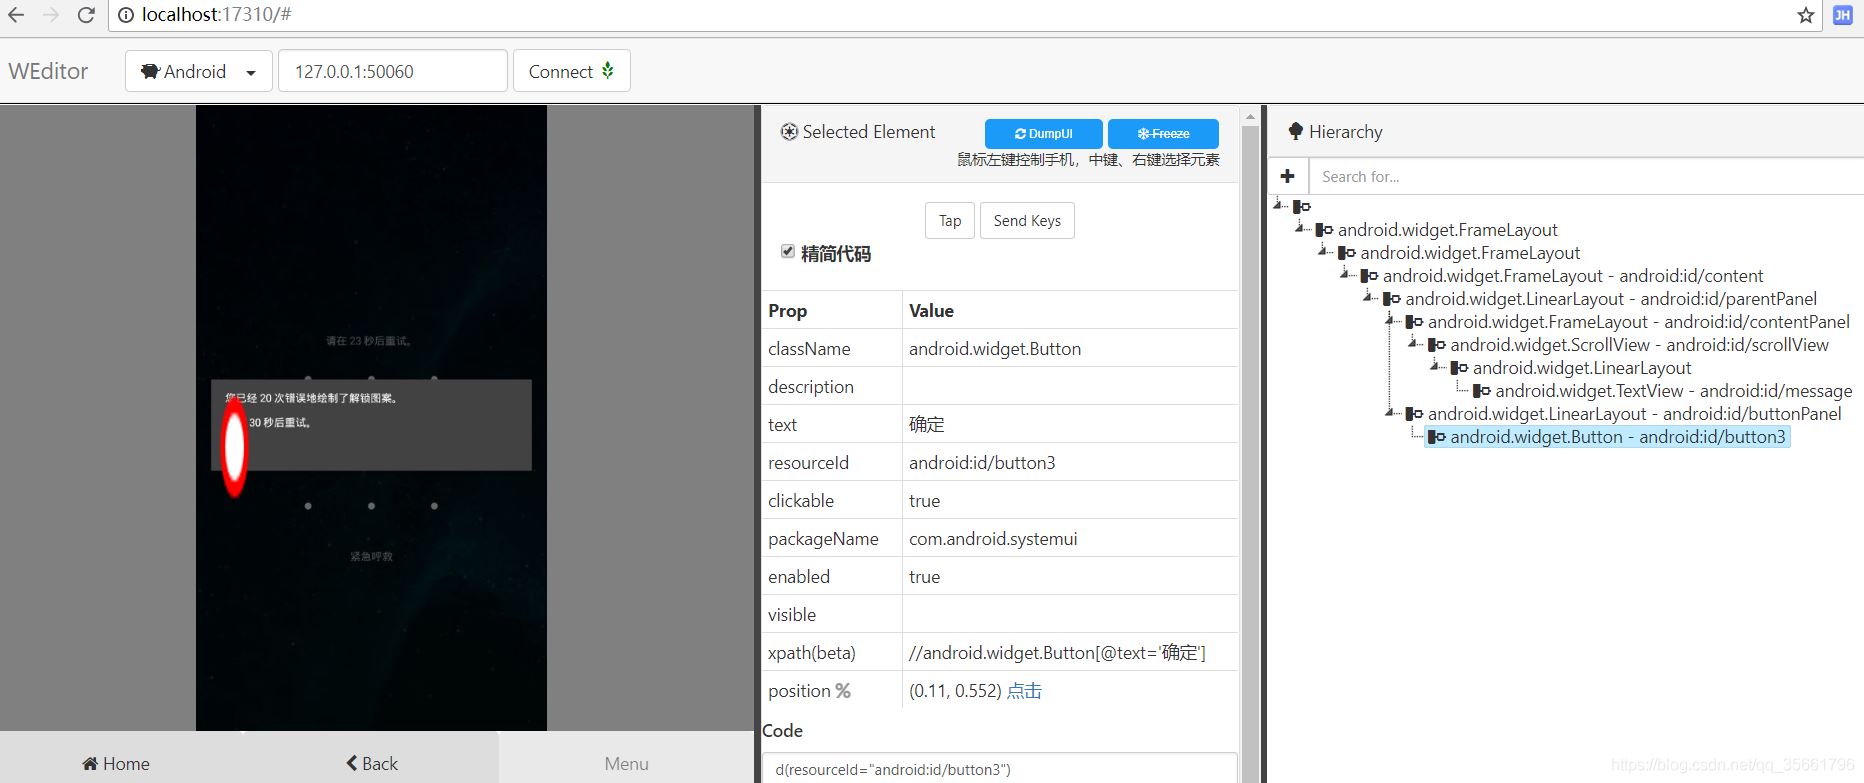
然后再选取元素定位就可以完成本次需求 代码如下: #_*_ coding:utf-8_*_import uiautomator2 as u2import reimport time STOP_COUNT=150d = u2.connect() #输入滑动解锁码def do_password(count): #通过weditor获取到的图案位置 d.swipe_points([(0.304, 0.431), (0.507, 0.435), (0.5, 0.636)], 0.1) #检验是否输入正确def do_check(): #检查输入密码是否达到现在 if d(resourceId="android:id/message").exists: message = d(resourceId="android:id/message").get_text() #取得输密码的次数 times = re.findall('/d+', message)[0] #需要等待的时间 timeout = re.findall('/d+', message)[1] print("暂时不能输入密码,这是第$s次输入,需要等待%s才可以再次输入" % (times, timeout)) return True, times, timeout else: print("可以输入") return False, 0, 0 count = 0 while True: ret, times, timeout = do_check() if ret: d.screenshot(times + "times_" + timeout + "s.jpg") if int(times) >= STOP_COUNT: break time.sleep(int(timeout)) d(resourceId="android:id/button3").click() count = count + 1 do_password(count)效果图: 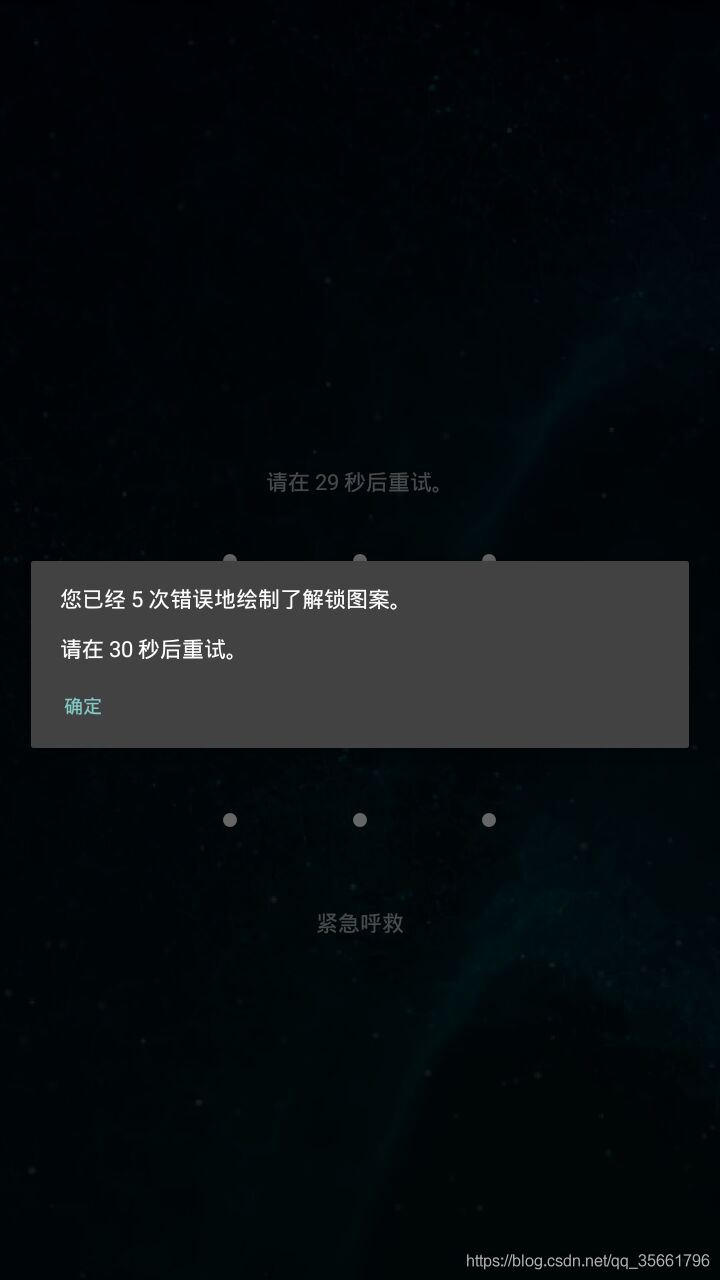
到此这篇关于Python+uiautomator2实现手机锁屏解锁功能的文章就介绍到这了,更多相关python uiautomator2手机锁屏解锁内容请搜索51zixue.net以前的文章或继续浏览下面的相关文章希望大家以后多多支持51zixue.net!
python 使用uiautomator2连接手机设备的实现
python-opencv实现视频指定帧数间隔图像的保存功能 |


