这篇教程基于OpenCV的摄像头测距的实现示例写得很实用,希望能帮到您。
前言去年暑假参加了一个比赛,比赛内容中需要确定目标的位置 本来想全用图像完成的,最后发现不是很符合要求。比完赛之后,就忙别的事了。直到现在突然想试试摄像头测距。就来了 
一、测距原理摄像头单目测距原理及实现 空间的深度或距离等数据的摄像头。 人的眼睛长在头部的前方,两只眼的视野范围重叠,两眼同时看某一物体时,产生的视觉称为双眼视觉。 双眼视觉的优点是可以弥补单眼视野中的盲区缺损,扩大视野,并产生立体视觉。 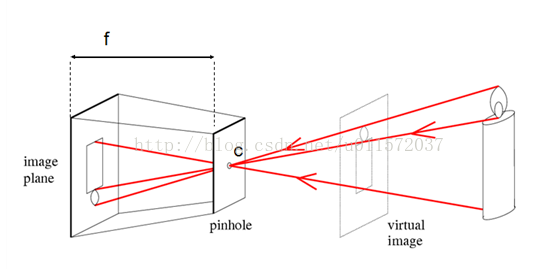
f为摄像头的焦距,c为镜头光心 模型的主要依据公式为f/d=h/H,设物体所在平面与相机平面的距离为d,物体实际高度为H,在传感器上的高度为h
根据这个模型,我们就能求出目标物体与我们的摄像头平面的距离。 分两种情况,但是这两种情况的条件都是假设实际物体与摄像机所在平面平行。 一种是当物体主线段过光心的情况,这种情况是最容易计算的, 即 h=sqrt ((横坐标之差*Dx)2+(纵坐标之差*Dy)2), Dx为每个像素的宽度,Dy为每个像素的高度,
二、代码
1.引入库代码如下(示例): import cv2from cvzone.HandTrackingModule import HandDetectorimport mathimport numpy as npimport cvzone
2.读入数据调用电脑摄像头,或者外接别的摄像头也可以
调用 cvzone 自带的手部检测器 cap = cv2.VideoCapture(0)cap.set(3, 1280)cap.set(4, 720)detector = HandDetector(detectionCon=0.8, maxHands=1) 编写函数,转化为距离循环打印显示 while True: success, img = cap.read() hands = detector.findHands(img, draw=False) if hands: lmList = hands[0]['lmList'] x, y, w, h = hands[0]['bbox'] x1, y1 = lmList[5] x2, y2 = lmList[17] distance = int(math.sqrt((y2 - y1) ** 2 + (x2 - x1) ** 2)) A, B, C = coff distanceCM = A * distance ** 2 + B * distance + C print(distanceCM, distance) cv2.rectangle(img, (x, y), (x + w, y + h), (255, 0, 255), 3) cvzone.putTextRect(img, f'{int(distanceCM)} cm', (x+5, y-10)) cv2.imshow("Image", img) cv2.waitKey(1)完整代码 import cv2from cvzone.HandTrackingModule import HandDetectorimport mathimport numpy as npimport cvzonecap = cv2.VideoCapture(0)cap.set(3, 1280)cap.set(4, 720)# Hand Detectordetector = HandDetector(detectionCon=0.8, maxHands=1)# Find Function# x is the raw distance y is the value in cmx = [300, 245, 200, 170, 145, 130, 112, 103, 93, 87, 80, 75, 70, 67, 62, 59, 57]y = [20, 25, 30, 35, 40, 45, 50, 55, 60, 65, 70, 75, 80, 85, 90, 95, 100]coff = np.polyfit(x, y, 2) # y = Ax^2 + Bx + Cwhile True: success, img = cap.read() hands = detector.findHands(img, draw=False) if hands: lmList = hands[0]['lmList'] x, y, w, h = hands[0]['bbox'] x1, y1 = lmList[5] x2, y2 = lmList[17] distance = int(math.sqrt((y2 - y1) ** 2 + (x2 - x1) ** 2)) A, B, C = coff distanceCM = A * distance ** 2 + B * distance + C print(distanceCM, distance) cv2.rectangle(img, (x, y), (x + w, y + h), (255, 0, 0), 3) cvzone.putTextRect(img, f'{int(distanceCM)} cm', (x+5, y-10)) cv2.imshow("Image", img) cv2.waitKey(1)效果图: 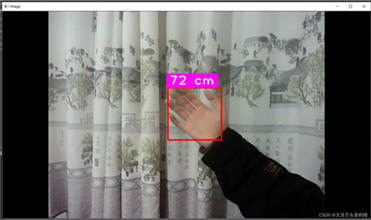
总结通过简单的几行代码,就可以实现视频测距。我是以手为检测目标测距,当然你也可以,调用别的分类检测器,搭配目标检测网络实现各种物体的检测 测距。(建议备一个,高清的摄像头。)
本项目的视频测距的 误差 大概在±2cm左右。 到此这篇关于基于OpenCV的摄像头测距的实现示例的文章就介绍到这了,更多相关OpenCV摄像头测距内容请搜索51zixue.net以前的文章或继续浏览下面的相关文章希望大家以后多多支持51zixue.net!
Python Barbershop实现照片换发型功能
python二进制转换模块的具体用法 |


